How to Prune an Aloe Plant for Healthy Growth
Learn how to prune an aloe plant for healthy growth with expert tips. Discover timing, techniques, and care secrets for thriving aloes.

Aloe plants have earned their spot as one of the most beloved houseplants around, and honestly, it's not hard to see why. These succulent beauties practically take care of themselves, offer soothing gel for minor burns and skin irritations, and look absolutely stunning sitting on a sunny windowsill. But here's something many plant parents don't realize: even these low-maintenance wonders benefit from occasional pruning.
Now, before you start worrying that you'll somehow mess up your precious aloe, take a deep breath. Pruning these resilient plants is far simpler than you might think. Unlike finicky houseplants that throw tantrums at the slightest interference, aloes are remarkably forgiving. They'll bounce back from pruning like champions, often growing back fuller and healthier than before.
The thing is, many people let their aloe plants grow wild without ever trimming them. While aloes can survive this neglect, they won't truly thrive. Dead leaves accumulate, pups crowd the mother plant, and what was once a tidy specimen becomes an unruly mess that looks more like a green octopus having a bad hair day.
Learning how to prune an aloe plant for healthy growth isn't just about aesthetics, though that's certainly a nice bonus. Proper pruning removes damaged tissue that can harbor pests and disease, encourages new growth from the center of the plant, and allows you to harvest that wonderful gel whenever you need it.
So whether your aloe is getting a bit leggy, showing some brown tips, or simply outgrowing its container, stick around. We're about to dive into everything you need to know about keeping your aloe in tip-top shape.
Understanding Why Aloe Plants Need Pruning
Before grabbing your scissors, understanding the reasoning behind pruning helps you make better decisions about what to remove and what to leave alone.
Natural Growth Patterns
Aloe vera and its cousins grow in a rosette pattern, with new leaves emerging from the center while older leaves naturally move toward the outside. As the plant matures, those outer leaves eventually die back, becoming brown, dry, and rather unsightly.
In the wild, this dead material would simply fall away or decompose naturally. In your living room, however, these dying leaves hang on stubbornly, draining energy from the plant and creating an unkempt appearance. They're basically freeloaders at this point, taking up space without contributing anything positive.
Beyond the outer leaves, aloe plants produce offsets or pups that cluster around the mother plant's base. While adorable at first, these babies eventually compete for resources, crowding roots and limiting the main plant's growth potential.
Signs Your Aloe Needs Attention
How do you know when pruning time has arrived? Your plant will tell you if you know what to look for.
Brown or yellowing leaves, especially on the outer edges of the rosette, signal natural aging and prime pruning candidates. Soft, mushy sections indicate overwatering damage or rot that needs immediate removal before spreading. Dried, crispy leaf tips suggest environmental stress but can be trimmed for appearance without harming the plant.
Overcrowded containers where you can barely see soil between clustered plants definitely need intervention. Leggy, stretched growth reaching desperately toward light indicates a plant needing both better positioning and some strategic trimming.

Tools and Preparation for Pruning
Having the right equipment ready makes the job easier and safer for both you and your plant.
Essential Pruning Tools
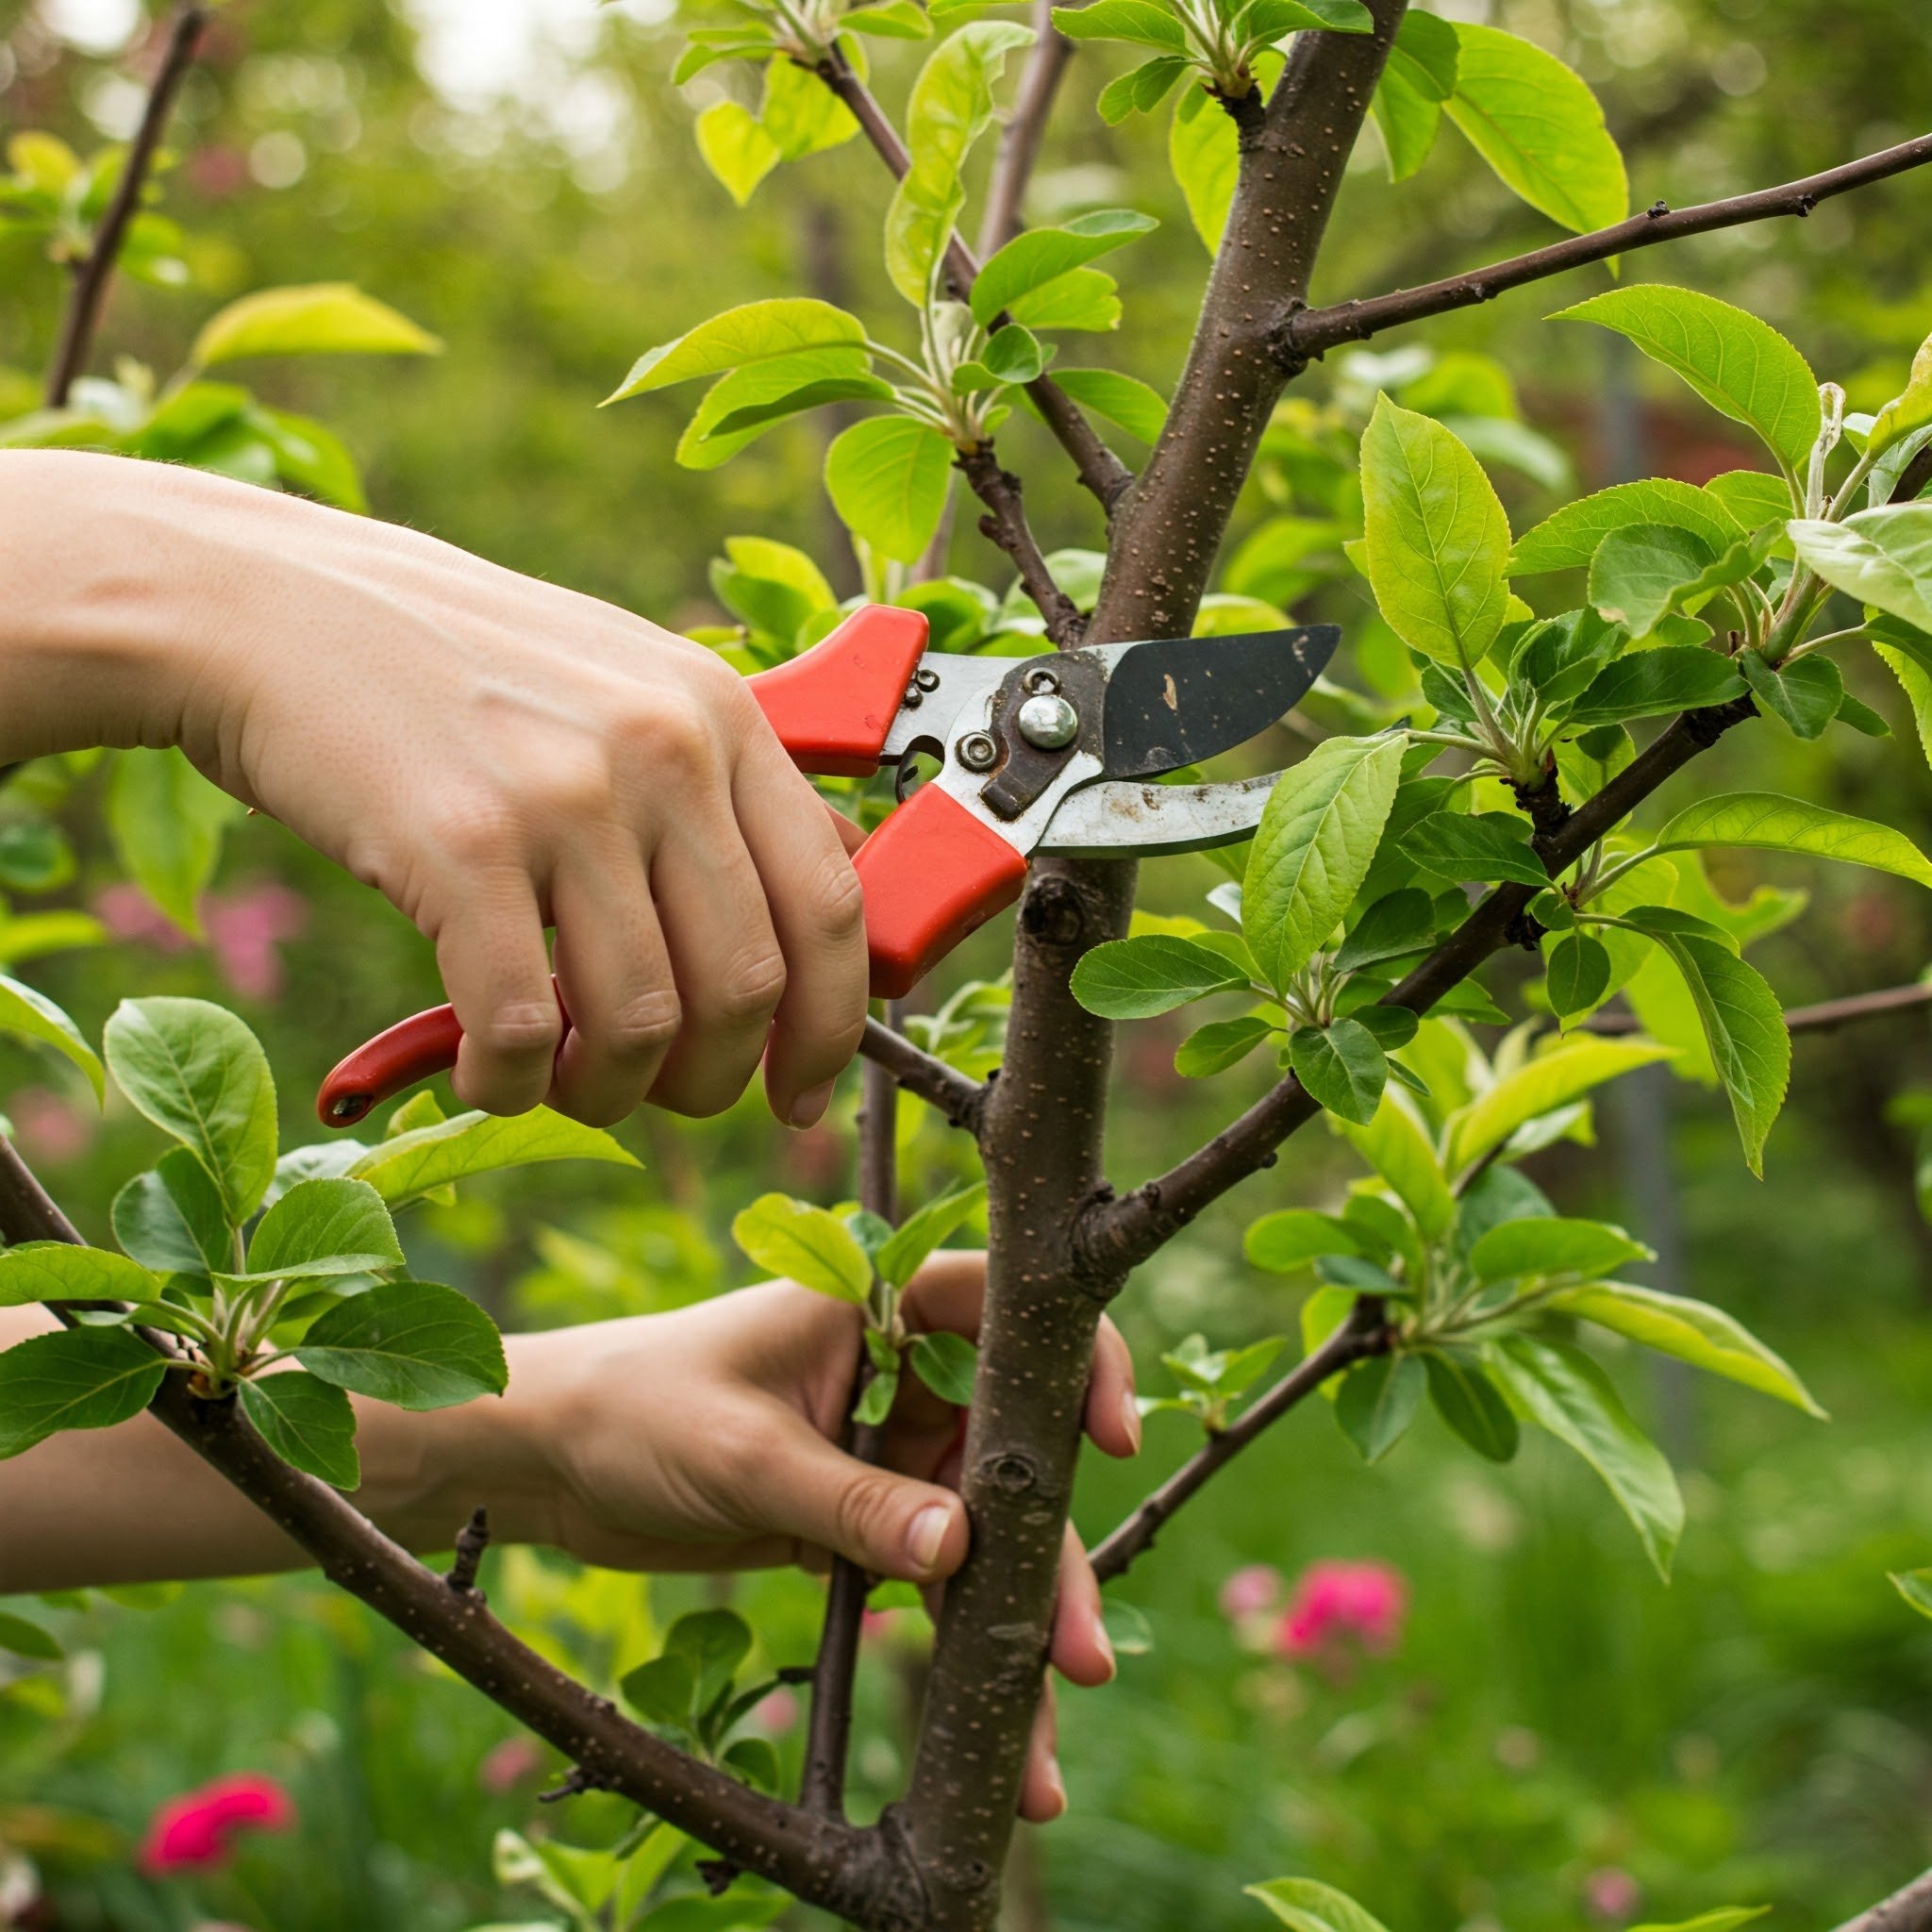
Sharp, clean tools are non-negotiable for healthy pruning. Dull blades crush plant tissue rather than cutting cleanly, creating wounds that heal slowly and invite infection.
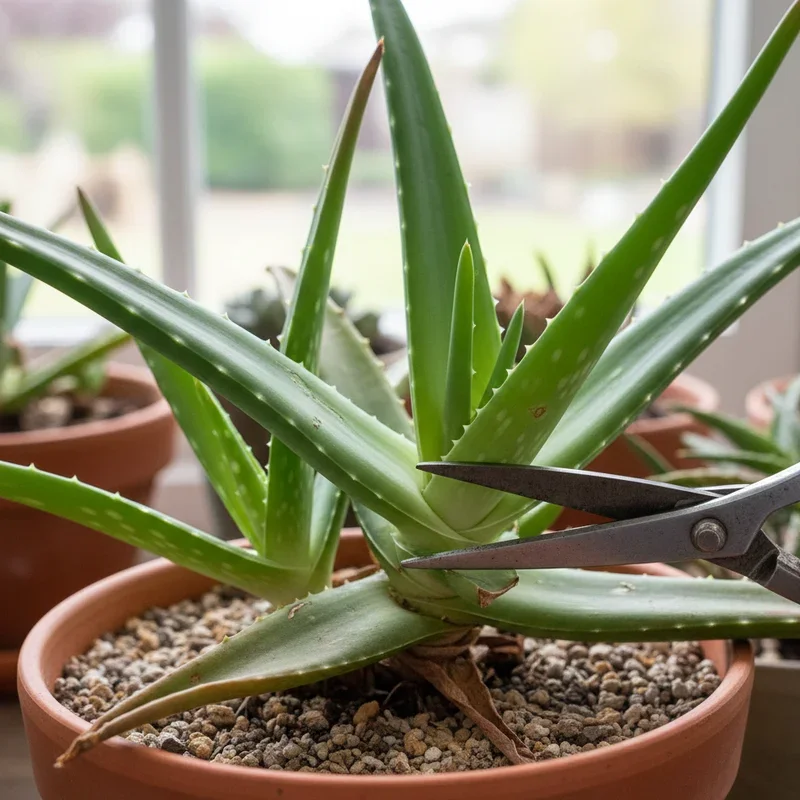
A sharp knife or razor blade works wonderfully for removing individual leaves close to the stem. Clean scissors or pruning shears handle larger jobs and multiple cuts efficiently. For thick, mature leaves, a small serrated knife makes the work easier.
Whatever tools you choose, sterilize them before starting. Wiping blades with rubbing alcohol or a diluted bleach solution kills bacteria and fungal spores that might otherwise transfer to fresh cuts. This simple step prevents countless problems down the road.
Preparing Your Workspace
Set up your pruning station before beginning. Lay down newspaper or a plastic sheet to catch the sticky gel that inevitably drips during cutting. Have paper towels handy for wiping your hands and tools as you work.
If you're planning to use harvested leaves for their gel, prepare containers for storage. Fresh aloe gel keeps refrigerated for about a week, or you can freeze it in ice cube trays for longer storage.
Wear old clothes or an apron. Aloe gel stains fabric and can be tricky to wash out completely. Gloves protect your hands from the yellow sap (aloin) found just beneath the leaf skin, which can irritate sensitive skin.
How to Prune an Aloe Plant for Healthy Growth Step by Step
Now for the main event. Follow these steps for successful pruning that promotes vigorous new growth.
Assessing What to Remove
Start by examining your plant from all angles. Identify leaves that are completely dead, mostly brown, or showing significant damage. These are your first targets.
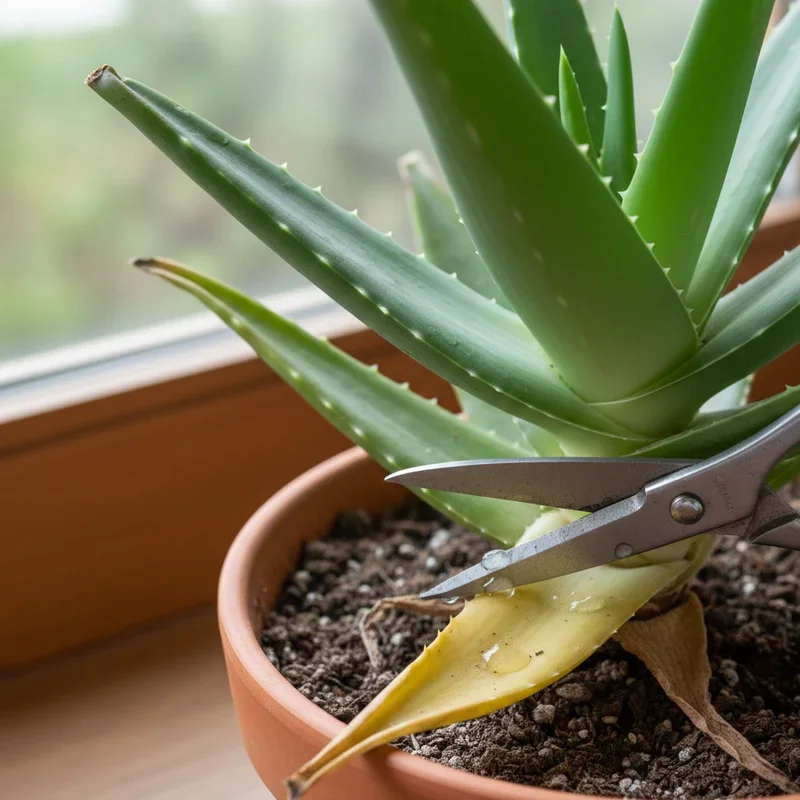
Next, look for leaves with soft, mushy sections. This damage typically indicates rot and needs removal regardless of how much green tissue remains. Rot spreads quickly through succulent tissue, so don't hesitate here.
Finally, consider the plant's overall shape and density. Are certain areas overcrowded? Is the plant lopsided? Strategic removal can improve both health and appearance simultaneously.
Removing Damaged or Dead Leaves
Begin with the outermost leaves and work inward. For completely dead leaves, simply grip firmly near the base and pull away from the stem with a gentle rocking motion. Many will detach cleanly without any cutting required.
Partially damaged leaves need knife or scissor work. Cut as close to the main stem as possible without actually damaging it. Clean cuts heal faster than ragged tears, so take your time and make deliberate incisions.
When removing leaves with rot, cut well into healthy tissue beyond the damaged area. That slight mushiness you see on the edge usually extends further than visible. Better to remove a bit extra than leave infected material behind.
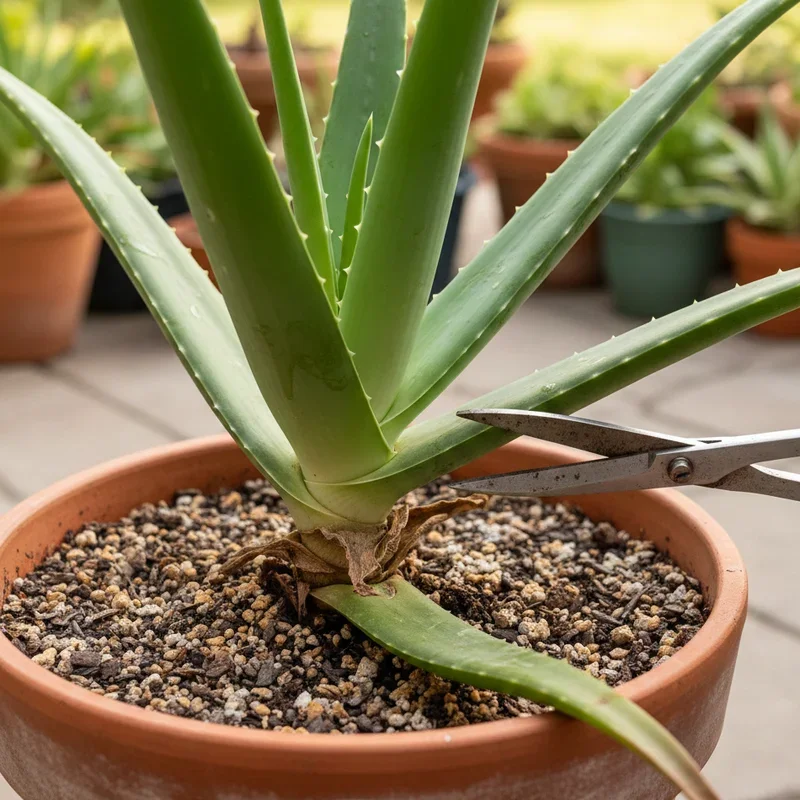
Harvesting Healthy Leaves
If you're pruning to harvest aloe gel, select the largest, most mature leaves from the outer ring of the rosette. These contain the most gel and are ready for harvest anyway, making this a win-win situation.
Cut leaves cleanly at the base, angling your knife slightly to make a diagonal cut. This shape helps remaining stem tissue shed water rather than collecting it, reducing rot risk at the wound site.
After cutting, hold the leaf upright for several minutes to allow yellow sap to drain away. This aloin compound is bitter and can cause digestive upset if consumed, so letting it drain improves the quality of harvested gel.
Managing Pups and Offsets
Those cute little baby plants clustered around your aloe's base might look adorable, but left unchecked, they'll eventually overwhelm the mother plant. Separating pups gives everyone more room to thrive.
Gently remove the plant from its container to access the root system. Brush away soil to see where pups connect to the main plant. Using a clean knife, cut the pup away including as much of its own root system as possible.
Allow separated pups to dry for a day or two before replanting. This callusing period lets cut surfaces heal, dramatically reducing rot risk when you pot them up in fresh soil.
Timing Your Pruning Sessions
When you prune matters almost as much as how you prune. Timing can mean the difference between quick recovery and prolonged stress.
Best Seasons for Pruning
Spring and early summer represent ideal pruning windows for aloe plants. During these seasons, plants are actively growing and recover from pruning quickly. New growth emerges rapidly to fill gaps left by removed leaves.
Avoid heavy pruning during winter months when growth slows significantly. The plant has less energy available for healing and producing new tissue. Light maintenance pruning removing dead material is fine year-round, but save major reshaping for warmer seasons.
How Often to Prune
Most aloe plants benefit from pruning once or twice yearly. Some fast-growing specimens in ideal conditions might need attention more frequently, while slower-growing plants in low light can go longer between sessions.
Watch your individual plant rather than following a rigid schedule. When you notice significant dead material accumulating or pups getting out of control, it's time to act regardless of the calendar.
Post-Pruning Care for Recovery
Your aloe needs a bit of extra attention immediately following pruning to ensure healthy recovery.
Wound Care
Fresh cuts on aloe plants usually seal themselves naturally, but you can help the process along. Keep newly pruned plants out of direct sunlight for several days, as intense light on fresh wounds can cause scarring.
Avoid watering immediately after pruning. Wait at least a week before resuming normal watering schedules. Moisture on fresh cuts dramatically increases infection risk, and your plant has reduced water needs while recovering anyway.
If you notice any cuts looking soft, discolored, or smelling unpleasant in the days following pruning, you may have developing rot. Cut further back into healthy tissue immediately and allow additional drying time.
Environmental Considerations
Provide your pruned aloe with stable conditions during recovery. Now isn't the time for repotting, moving to a new location, or otherwise stressing the plant. Let it focus energy on healing rather than adapting to change.
Bright, indirect light serves recovering plants better than intense direct sun. Once new growth emerges and wounds have fully healed, typically within two to three weeks, you can gradually return the plant to its preferred light conditions.
Common Pruning Mistakes to Avoid
Learning from others' errors saves your plant from unnecessary stress.
Over-Pruning
Enthusiasm sometimes leads gardeners astray. Removing more than one-third of a plant's foliage at once creates significant stress that can take months to overcome. When in doubt, prune conservatively. You can always remove more later.
Never cut into the central growing point of your aloe. Damaging this area can permanently stunt the plant or even kill it. Always leave the newest, innermost leaves untouched unless they show clear signs of disease.
Improper Tool Hygiene
Using dirty tools spreads disease between plants and introduces pathogens directly into fresh wounds. Even if your tools look clean, invisible fungal spores and bacteria lurk on blades that haven't been properly sterilized.
This applies between cuts on the same plant too. If you're removing diseased tissue, clean your tools before making cuts on healthy portions. Cross-contamination happens faster than you'd think.
Ignoring Root Health
Surface pruning addresses only half the plant. If your aloe's roots are circling the container, rotting in soggy soil, or otherwise unhealthy, leaf pruning alone won't solve underlying problems.
When you have your plant out for pup removal, take a moment to assess root health. Trim away any dead, mushy, or circling roots while you're at it. Healthy roots support healthy leaves.
Benefits of Regular Aloe Pruning
Consistent maintenance pruning creates happier, more attractive plants.
Removing dead material eliminates hiding spots for pests like mealybugs that love tucking into crevices between dying leaves. Improved air circulation around the plant reduces fungal disease risk. The plant directs energy toward healthy tissue rather than maintaining damaged leaves.
Regular pup removal prevents overcrowding that leads to stunted growth and competing root systems. You'll also end up with plenty of baby plants to share with friends, trade with fellow plant enthusiasts, or expand your own collection.
Aesthetically, a well-pruned aloe simply looks better. Clean lines, healthy green foliage, and a balanced shape transform scraggly specimens into genuine focal points worthy of prominent display.
Conclusion
Mastering how to prune an aloe plant for healthy growth transforms your approach to caring for these wonderful succulents. With clean tools, proper timing, and attention to your plant's specific needs, pruning becomes a simple routine rather than an intimidating task. Regular maintenance keeps your aloe looking its best while promoting vigorous growth and preventing disease. Whether harvesting gel or simply tidying up, confident pruning skills benefit both you and your beloved plant.
Read next: How to Prune Trees Like a Pro? Tips and Techniques
Frequently Asked Questions
1.Can I prune my aloe plant during winter months?
Light maintenance pruning is fine, but save major pruning for spring when recovery is faster.
2.How do I know if I've pruned too much?
Removing more than one-third of foliage causes stress, wilting, and significantly slowed growth patterns.
3.Should I apply anything to fresh cuts after pruning?
No, aloe wounds heal best when left dry and exposed to air without any treatments applied.
4.Can pruned aloe leaves regrow from the cut point?
No, individual leaves don't regenerate, but the plant produces new leaves from its center continuously.
5.What should I do with removed pups after pruning?
Allow pups to dry for two days, then plant in well-draining soil for new plants.