How to Identify and Remove Cutworms in Your Garden
Learn how to spot and eliminate cutworms destroying your plants. Discover proven methods to protect your garden from these nocturnal pests naturally.
Well, isn't it just peachy when you wake up to find your beautiful seedlings chopped down like tiny trees in a logging operation? If you've been scratching your head wondering what invisible lumberjack has been wreaking havoc in your garden overnight, chances are you're dealing with cutworms. These sneaky little critters work under cover of darkness, leaving gardeners everywhere pulling their hair out in frustration.
But here's the thing: once you know what you're looking for, dealing with these pesky caterpillars becomes a whole lot easier. Whether you're a seasoned green thumb or just starting your gardening journey, understanding how to identify and remove cutworms in your garden can save your plants and your sanity. So grab a cup of coffee, and let's dive into everything you need to know about these nocturnal nuisances!
What Exactly Are Cutworms?
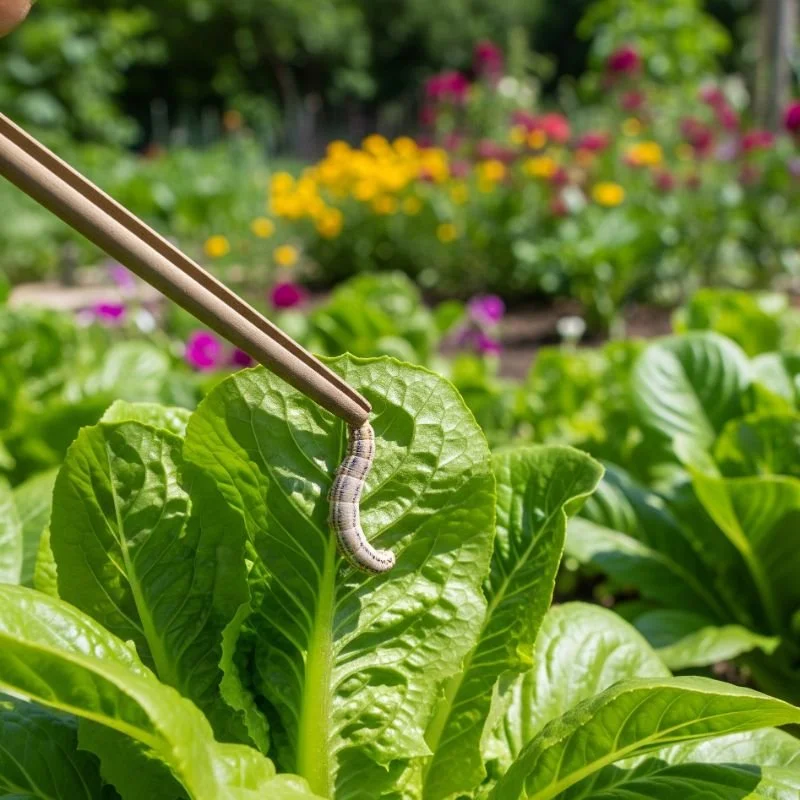
Before we jump into the nitty-gritty of identification, let's talk about what these garden villains actually are. Cutworms aren't worms at all, despite their misleading name. They're actually the larvae of various moth species that belong to the Noctuidae family. Pretty surprising, right?
These plump caterpillars got their name from their nasty habit of "cutting" through plant stems at or just below the soil surface. It's like they're playing a twisted game of timber with your precious seedlings! Most cutworms are between one to two inches long when fully grown, and they come in various colors ranging from gray and brown to black, often with stripes or spots.
The real kicker? There are several types of cutworms, and each has its own particular brand of destruction:
Black cutworms: The most common troublemakers in many gardens
Variegated cutworms: These guys climb up plants to feast on foliage
Army cutworms: They travel in groups, causing widespread damage
Dingy cutworms: Prefer to munch on grass and cereal crops
Glassy cutworms: Often found in gardens with sandy soil
How to Identify and Remove Cutworms in Your Garden: The Tell-Tale Signs
Now, identifying these sneaky pests isn't always straightforward since they're nocturnal creatures. But boy oh boy, the damage they leave behind is hard to miss! Here's what to look for:
Visual Damage Clues
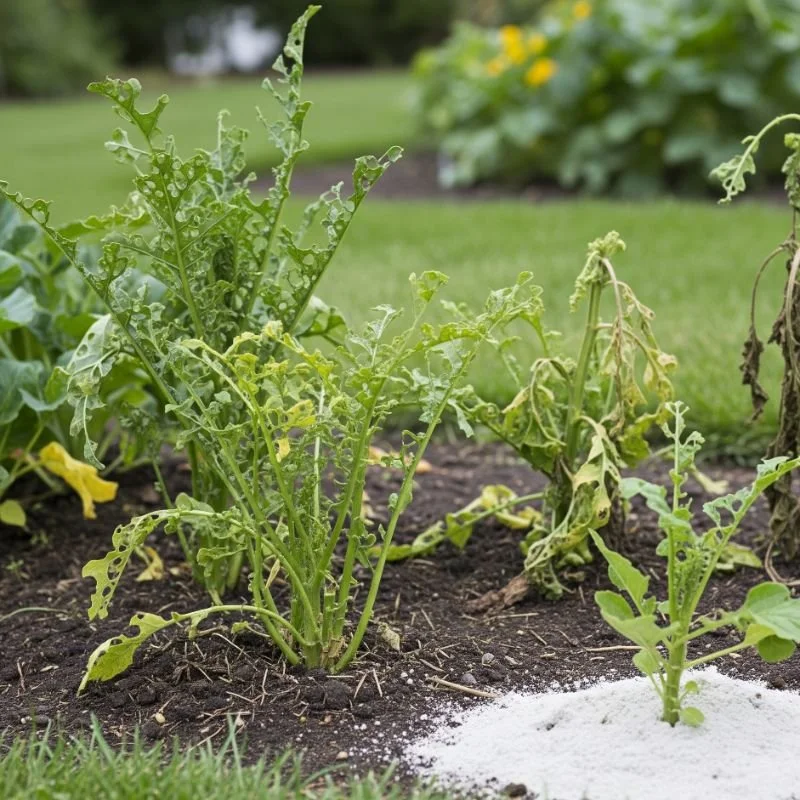
The most obvious sign you've got cutworms is finding your young plants severed at the base, lying on the ground like fallen soldiers. It's heartbreaking, really. You might notice:
Seedlings cut off at soil level or just below
Wilted plants that haven't been completely severed
Missing leaves on older plants (thanks to climbing cutworms)
Small holes in leaves and stems
Plants that mysteriously disappear overnight
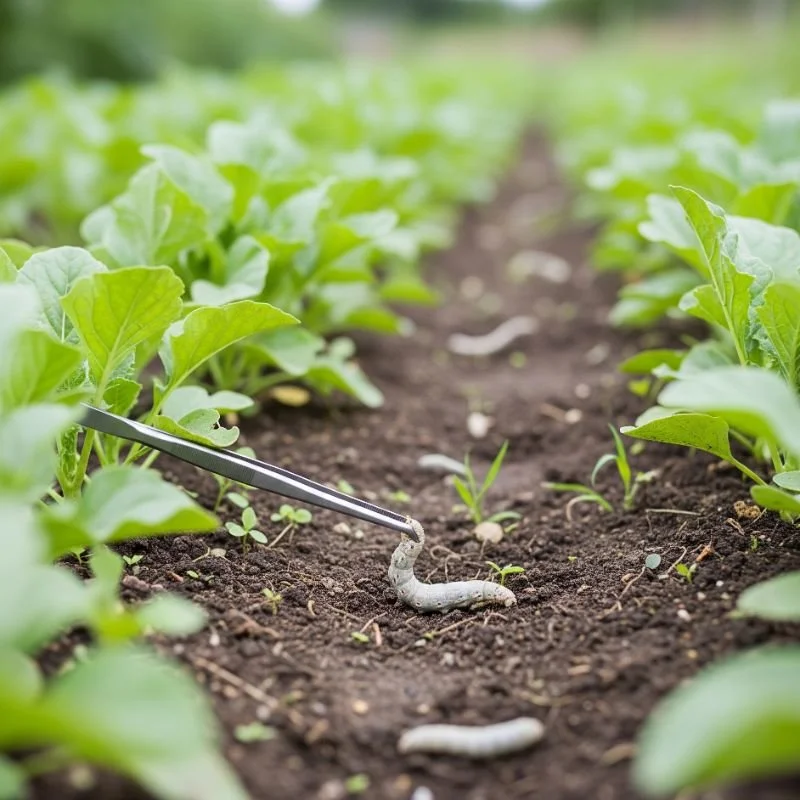
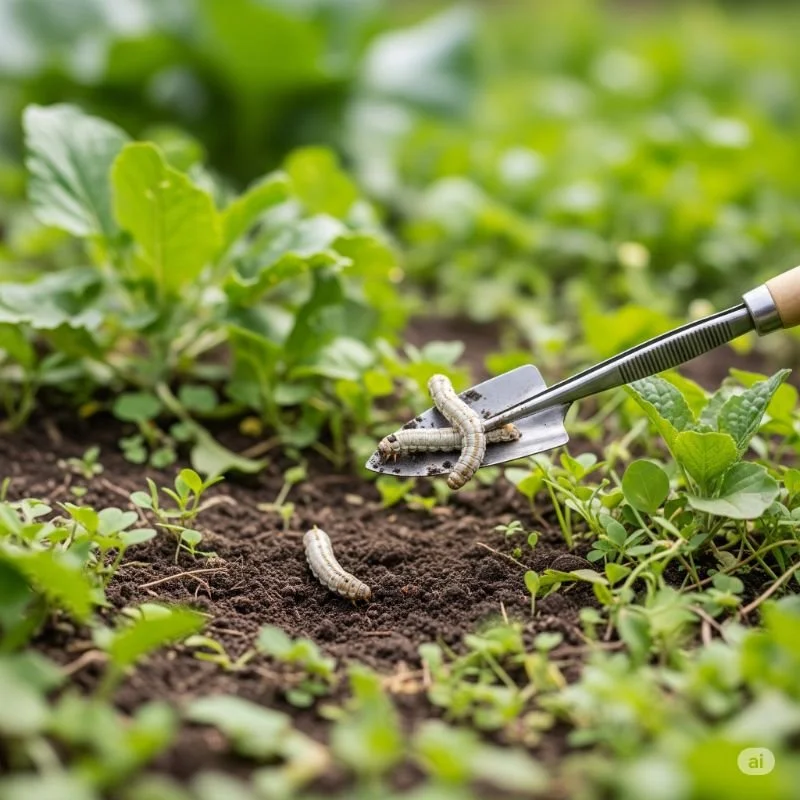
Finding the Culprits
Since cutworms hide during the day, you'll need to do a bit of detective work. Here's how to catch them red-handed:
Dig around damaged plants: Gently excavate the soil within a few inches of affected plants
Look for C-shaped caterpillars: When disturbed, cutworms curl into a tight C-shape
Check at night: Use a flashlight to spot them feeding after dark
Search under debris: They love hiding under mulch, boards, and plant debris
Physical Characteristics to Look For
When you do find them, here's what you're looking at:
Size: Usually 1-2 inches long when mature
Color: Gray, brown, black, or greenish
Texture: Smooth, greasy-looking skin
Markings: May have stripes, spots, or uniform coloring
Behavior: Curl into a C when touched
The Life Cycle: Know Your Enemy
Understanding the cutworm life cycle helps you time your control efforts perfectly. These critters go through complete metamorphosis, just like butterflies, but with far less charming results!
Spring Awakening
As soil temperatures warm up in spring, overwintering cutworm larvae become active. They're absolutely ravenous after their winter nap and start feeding immediately. This is when most gardeners first notice damage.
Summer Transformation
By early summer, larvae pupate in the soil. After a few weeks, adult moths emerge. These gray or brown moths are pretty unremarkable looking, and you might not even notice them flying around your garden at night.
Fall Egg-Laying
Female moths lay hundreds of eggs on grass, weeds, or plant debris. Some species produce multiple generations per year, while others stick to just one. The eggs hatch into tiny larvae that feed until cold weather arrives.
Winter Survival
Depending on the species, cutworms overwinter as larvae, pupae, or eggs. They hunker down in the soil or under plant debris, waiting for spring to start the cycle all over again.
Prevention: Your First Line of Defense
You know what they say: an ounce of prevention is worth a pound of cure! And when it comes to cutworms, this couldn't be more true. Let's explore some preventive measures that'll help keep these pests at bay.
Garden Cleanup
Keeping your garden tidy isn't just about aesthetics; it's crucial for cutworm control:
Remove weeds and grass from garden beds
Clear away plant debris before winter
Till the soil in fall to expose overwintering larvae
Keep grass edges well-trimmed around garden beds
Timing Your Planting
Sometimes, patience pays off:
Wait to plant until after peak cutworm activity (usually early spring)
Use transplants instead of direct seeding when possible
Start seeds indoors and transplant larger seedlings
Creating Barriers
Physical barriers work wonders for protecting individual plants:
Collar method: Place cardboard or aluminum foil collars around stems
Toilet paper rolls: Cut them in half and place around seedlings
Plastic cups: Remove bottoms and press into soil around plants
Toothpicks: Place several around stems to prevent cutworms from wrapping around
Natural Control Methods
Who says you need harsh chemicals to deal with garden pests? Mother Nature's got your back with these eco-friendly solutions!
Beneficial Predators
Encourage natural enemies to take up residence in your garden:
Birds: Robins, blackbirds, and crows love cutworm snacks
Ground beetles: These nocturnal hunters feast on cutworm larvae
Parasitic wasps: They lay eggs in cutworms, eventually killing them
Toads and frogs: Set up a small pond to attract these helpers
Biological Controls
Some natural products work great against cutworms:
Bacillus thuringiensis (Bt): This naturally occurring bacteria specifically targets caterpillars
Beneficial nematodes: Microscopic worms that parasitize cutworms
Diatomaceous earth: Sprinkle around plants to create a barrier
Companion Planting
Some plants naturally repel cutworms or attract their predators:
Tansy
Sage
Thyme
Onions
Garlic
Organic Solutions That Really Work
Going organic doesn't mean going defenseless! Here are some tried-and-true organic methods for dealing with cutworms.
The Coffee Ground Trick
Believe it or not, used coffee grounds can help deter cutworms. Sprinkle them around susceptible plants. Not only do cutworms dislike crawling over the rough texture, but coffee grounds also add nitrogen to your soil. Talk about a win-win!
Cornmeal Bait
This old-timer's trick really works! Sprinkle cornmeal around affected areas. Cutworms can't digest it properly, and well, let's just say it doesn't end well for them. Plus, it's completely safe for pets and beneficial insects.
Wood Ash Barriers
If you've got a fireplace or fire pit, save that ash! Creating a ring of wood ash around plants deters cutworms and adds potassium to your soil. Just don't overdo it, as too much ash can affect soil pH.
Molasses Spray
Mix 1 tablespoon of molasses with 1 cup of water and spray on affected areas. The sweet smell attracts beneficial insects while making leaves less palatable to cutworms.
How to Identify and Remove Cutworms in Your Garden: Chemical Options
Sometimes, despite our best efforts, organic methods just aren't cutting it (pun intended!). When cutworm populations get out of hand, you might need to bring in the big guns.
Choosing the Right Pesticide
If you decide to go the chemical route, look for products containing:
Carbaryl
Permethrin
Cyfluthrin
Spinosad (technically organic but very effective)
Application Tips
Getting the timing and technique right makes all the difference:
Apply in the evening: That's when cutworms are most active
Target the soil surface: Don't waste product on foliage
Create a barrier: Treat a band of soil around plants
Follow label directions: More isn't always better
Reapply after rain: Most products wash away easily
Safety First
Remember, these are poisons we're talking about:
Wear protective clothing and gloves
Keep pets and children away from treated areas
Don't apply on windy days
Store products safely and properly
Consider impact on beneficial insects
Monitoring and Long-Term Management
Dealing with cutworms isn't a one-and-done situation. It requires ongoing vigilance and a comprehensive approach.
Regular Inspections
Make garden checks part of your routine:
Morning patrols: Look for fresh damage
Evening hunts: Search for active cutworms with a flashlight
Weekly soil checks: Dig around susceptible plants
Keep records: Note when and where you find cutworms
Integrated Pest Management (IPM)
The best approach combines multiple strategies:
Cultural controls: Garden cleanup, crop rotation, proper timing
Physical barriers: Collars, row covers, hand-picking
Biological controls: Beneficial insects, Bt, nematodes
Chemical controls: Use as a last resort
Building Healthy Soil
Healthy plants resist pest damage better:
Add compost regularly
Maintain proper soil pH
Ensure good drainage
Use balanced fertilizers
Practice crop rotation
Troubleshooting Common Problems
Even with the best plans, things don't always go smoothly. Here's how to handle common cutworm control challenges.
"I've Tried Everything and They're Still There!"
Sometimes cutworms seem unstoppable. If this sounds familiar:
Check for reinfestation sources (weedy areas, compost piles)
Consider multiple cutworm species with different habits
Evaluate your timing (are you treating when they're active?)
Look for egg-laying sites and eliminate them
Protecting Large Areas
When you're dealing with a big garden, individual plant protection isn't practical:
Focus on border treatments
Use broadcast applications of Bt or nematodes
Create trap crops to concentrate cutworms
Consider systematic soil treatments
Recurring Infestations
If cutworms return year after year:
Examine your fall cleanup routine
Consider soil solarization in problem areas
Rotate crops to break the cycle
Address underlying issues (excess thatch, poor drainage)
Special Considerations for Different Plants
Not all plants face the same cutworm risks. Here's how to protect specific crops:
Tomatoes and Peppers
These garden favorites are cutworm magnets:
Use sturdy collars at transplanting
Stake plants early to minimize ground contact
Keep lower leaves pruned
Monitor closely during first month after transplanting
Brassicas (Cabbage, Broccoli, Cauliflower)
Cutworms love these nutrient-rich plants:
Start with larger transplants when possible
Use row covers during establishment
Apply Bt weekly during peak season
Interplant with strong-scented herbs
Corn and Beans
Direct-seeded crops face unique challenges:
Treat seeds with approved seed treatments
Plant extra seeds to compensate for losses
Use in-furrow treatments at planting
Consider replanting if damage exceeds 20%
Success Stories and Lessons Learned
Learning from others' experiences can save you time and frustration. Here are some real-world insights from gardeners who've won the cutworm battle.
The Newspaper Collar Victory
Sarah from Ohio swears by newspaper collars: "I make them 3 inches tall and push them an inch into the soil. Haven't lost a tomato plant to cutworms in five years!"
The Night Hunter Approach
Tom in California takes a proactive approach: "I go out with a flashlight every evening for the first two weeks after transplanting. Hand-picking works great if you're consistent."
The Companion Planting Convert
Maria from Texas discovered companion planting by accident: "I noticed cutworms avoided my tomatoes planted near onions. Now I always interplant them!"
Conclusion
Dealing with cutworms might feel like fighting an invisible enemy, but armed with the right knowledge and tools, you can absolutely win this battle. Remember, the key to successfully managing these pests lies in early identification, consistent monitoring, and using a combination of prevention and control methods. Whether you choose organic solutions or need to resort to stronger measures, staying vigilant and acting quickly when you spot the first signs of damage will save your garden from major devastation.
Read next: How to Get Rid of Ants in Garden Without Killing Plants
Frequently Asked Questions
Q1: When are cutworms most active in the garden?
A: They're most active at night during spring and early summer months.
Q2: Can cutworms kill established plants?
A: Usually they only severely damage young seedlings and transplants.
Q3: Do cutworms attack all types of plants?
A: They prefer tender vegetables but will eat many plant types.
Q4: How deep do cutworms hide in soil?
A: Typically one to three inches below the soil surface.
Q5: Will cutworms return next year?
A: Yes, without proper fall cleanup and prevention measures implemented.