How to Propagate Monstera: Step-by-Step Guide
Master monstera propagation with our easy step-by-step guide. Learn water and soil methods, timing tips, and troubleshooting for healthy new plants.

Holy Swiss cheese, Batman! So you've fallen head over heels for your Monstera deliciosa and now you want more of these gorgeous green giants? Well, aren't you in for a treat! Propagating monstera is like getting free plants from the plant fairy herself, except you're the fairy, and instead of a magic wand, you've got pruning shears.
I'll let you in on a little secret: monsteras are practically begging to be propagated. These tropical showstoppers are some of the easiest houseplants to multiply, and once you learn the ropes, you'll be giving away baby monsteras like they're going out of style (spoiler alert: they never will!). Whether you're looking to expand your own jungle, share the love with friends, or maybe even make a few bucks on the side, mastering "How to Propagate Monstera: Step-by-Step Guide" is about to become your new favorite party trick.
Trust me, there's something absolutely magical about watching those first tiny roots emerge from a cutting you snipped yourself. It's like plant parenthood on steroids! So grab your favorite beverage, roll up those sleeves, and let's dive into the wonderful world of making more monsteras!
Understanding Monstera Propagation Basics
Why Monsteras Are Propagation Superstars
Let me tell you, monsteras are the overachievers of the propagation world. These babies come equipped with everything they need to make more of themselves:
Aerial roots: Those weird brown things? They're ready-made root starters!
Nodes: The bumpy bits where leaves meet stems? That's where the magic happens
Fast growth: These plants grow like teenagers eat pizza
Forgiving nature: Mess up? They'll probably forgive you anyway
The Science Behind the Magic (Don't Worry, It's Simple!)
Without getting too nerdy on you, here's what's going on when you propagate:
Nodes contain meristem tissue (fancy word for "baby plant cells")
When cut, the plant goes into survival mode
Hormones redirect energy to root production
New roots grow from the node area
Voila! New plant is born
It's basically plant surgery, except way easier and with a much higher success rate than human surgery. Thank goodness!
Best Time to Propagate Your Monstera
Timing isn't everything, but it sure helps! Here's when your monstera is most likely to cooperate:
Spring and summer: Growth season = propagation season
When the parent plant is healthy: Stressed plants make sad cuttings
After a growth spurt: More material to work with
When you see aerial roots: Nature's way of saying "I'm ready!"
Essential Tools and Materials You'll Need
The Propagation Toolkit
Before we get our hands dirty (or wet, depending on your method), let's gather our supplies:
Must-Haves:
Sharp, clean pruning shears or knife
Glass jars or containers (for water propagation)
Fresh potting mix (for soil propagation)
Small pots with drainage holes
Rooting hormone (optional but helpful)
Rubbing alcohol (for sterilizing tools)
Nice-to-Haves:
Propagation station (fancy but fun!)
Moss pole or support stick
Humidity dome or plastic bag
Heat mat (speeds things up)
Grow light (for darker spaces)
Choosing the Right Cutting Tools
Listen up, because this is important! Using dirty or dull tools is like performing surgery with a butter knife. Not cool. Here's what you need to know:
Sharp = clean cuts = happy plants
Sterilize between cuts (plant diseases are real, folks!)
Bypass pruners > anvil pruners for clean cuts
A sharp knife works too if you're steady-handed
How to Propagate Monstera: Step-by-Step Guide - Finding the Perfect Cutting
Anatomy of a Monstera Cutting
Alright, plant anatomy 101! Don't worry, there won't be a test. When selecting your cutting, you're looking for:
At least one node (non-negotiable!)
One or two leaves (for photosynthesis)
Aerial root if possible (head start!)
Healthy, pest-free growth (obviously)
Where to Make the Cut
This is where people get nervous, but honestly, monsteras are pretty forgiving. Here's your game plan:
Find a node with a leaf
Cut 1-2 inches below the node
Make sure you include the node!
Angle the cut at 45 degrees (increases surface area)
Pro Tips for Cutting Success:
Morning cuts heal faster
Avoid cutting the newest growth
Don't take more than 1/3 of the parent plant
Leave at least 3-4 leaves on the parent
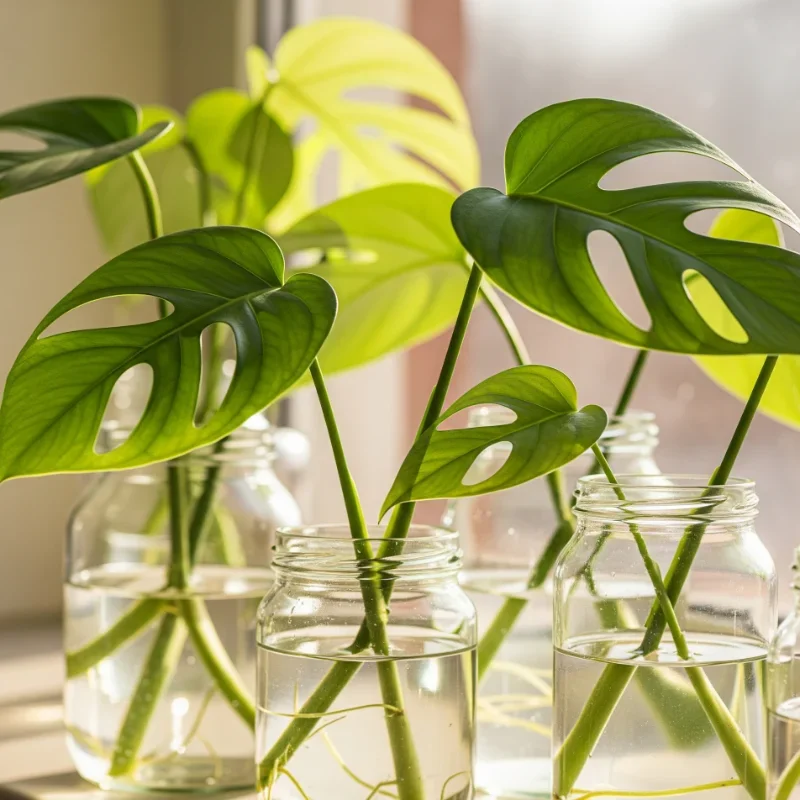
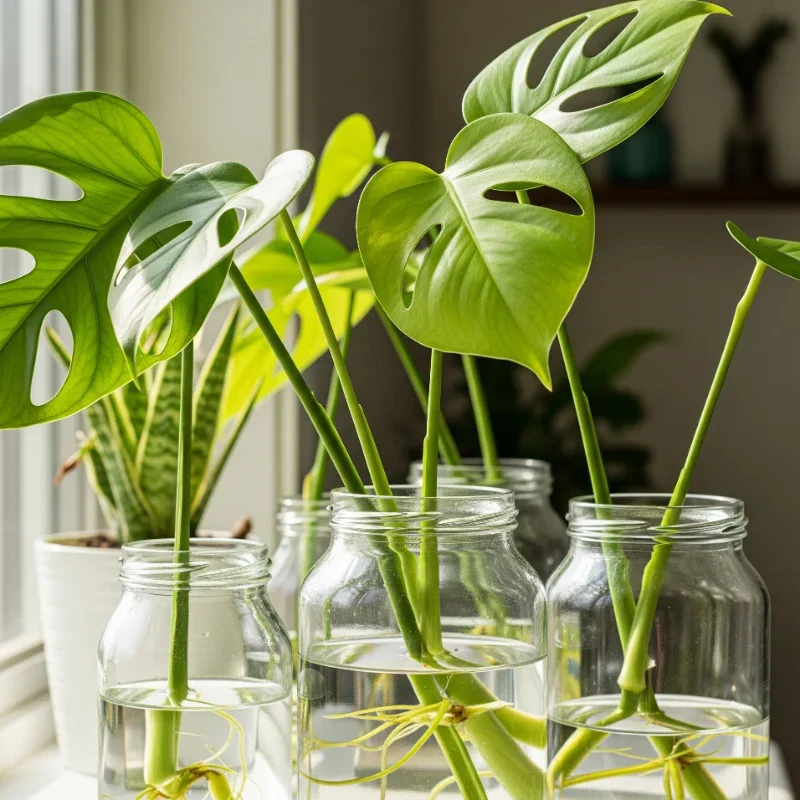
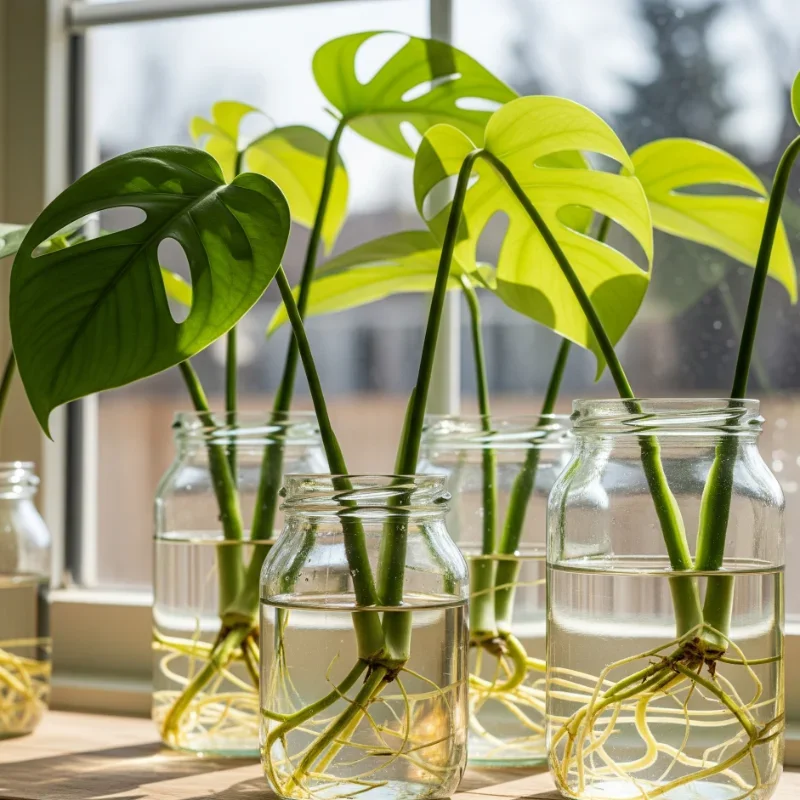
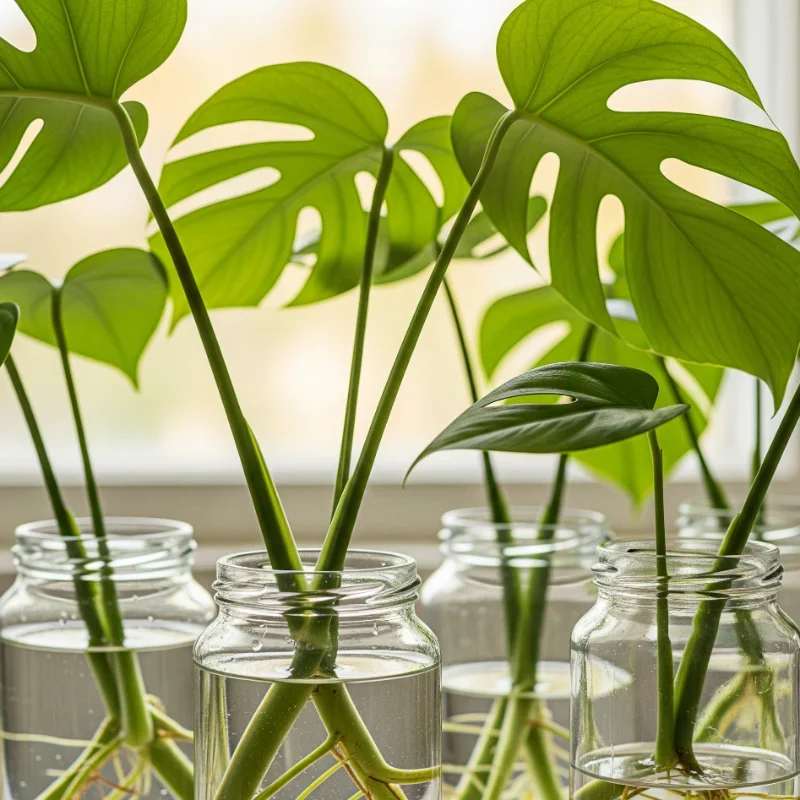
Water Propagation Method: The Fan Favorite
Why Water Propagation Rocks
Water propagation is like watching a slow-motion nature documentary in your kitchen. You get to see every little root as it develops! Plus:
Easy to monitor progress
Less chance of rot (if done right)
No soil mess
Super satisfying to watch
Step-by-Step Water Propagation
Here we go, the moment you've been waiting for! Follow these steps and you'll be golden:
Prepare your cutting
Remove any leaves that would be underwater
Let the cut callus for an hour (optional)
Apply rooting hormone to cut end (optional)
Set up your water station
Use room temperature water
Filtered or distilled is best
Clear container for root viewing!
Place cutting in water
Submerge the node completely
Keep leaves above water
Position in bright, indirect light
Maintain your propagation station
Change water weekly (or when cloudy)
Top off as needed
Watch for algae growth
Wait for roots (the hard part!)
First nubs appear in 1-2 weeks
Substantial roots in 4-6 weeks
Plant when roots are 2-3 inches long
Water Propagation Troubleshooting
Things not going according to plan? Here's your fix-it guide:
Mushy Stem
Cut above the rot immediately
Change water more frequently
Ensure node isn't too deep
No Roots After 3 Weeks
Check water temperature (too cold?)
Increase light exposure
Try rooting hormone
Be patient (some are slow)
Algae Growth
Move to opaque container
Change water more often
Add activated charcoal
Soil Propagation Method: The Direct Approach
When to Choose Soil Over Water
Some folks swear by soil propagation, and here's why:
No transplant shock later
Roots adapted to soil from the start
Often faster overall process
Less maintenance required
Step-by-Step Soil Propagation
Ready to get your hands dirty? Let's do this!
Prepare your potting mix
Mix perlite with potting soil (50/50)
Moisten thoroughly
Fill small pot with drainage
Prep your cutting
Same as water method
Dip in rooting hormone
Let cut dry slightly
Plant your cutting
Make hole with pencil
Insert cutting, node below soil
Firm soil gently around stem
Create humidity
Cover with plastic bag
Or use humidity dome
Ensure air circulation
Provide proper care
Keep soil moist, not wet
Bright, indirect light
Remove cover once weekly for air
Soil Propagation Success Secrets
Bottom heat speeds rooting dramatically
Consistent moisture is key (not soggy!)
Don't disturb for at least 3 weeks
Tug test after a month (resistance = roots!)
Air Layering: The Advanced Technique
What the Heck is Air Layering?
Okay, this one sounds fancy, but it's actually pretty cool! Air layering is like propagating while the cutting is still attached to the parent plant. Mind blown, right?
When to Use Air Layering
This method is perfect when:
You want a larger starter plant
The stem is too thick to cut easily
You're nervous about killing a cutting
You want guaranteed success
Air Layering Step-by-Step
Choose your spot
Find a node on a mature stem
Ideally with an aerial root
Wound the stem (sounds brutal, but it's okay!)
Make small upward cut below node
Or remove small section of outer stem
Apply rooting hormone
Dust the wounded area
Don't skip this step!
Wrap with moist sphagnum moss
Soak moss and squeeze out excess
Pack around wounded area
Cover with plastic
Use clear plastic wrap
Secure top and bottom
Leave small air hole
Wait and watch
Keep moss moist
Roots visible in 4-8 weeks
Cut below roots when ready
Moss Propagation: The Humidity Lover's Dream
Why Moss Propagation Works Wonders
Sphagnum moss is like a cozy blanket for your cuttings. It provides:
Perfect moisture balance
Natural antifungal properties
Excellent aeration
Gentle support for new roots
The Moss Method Explained
This is basically the middle ground between water and soil:
Prepare your moss
Soak in water for 30 minutes
Squeeze out excess (damp, not dripping)
Set up container
Use clear container with lid
Layer moss in bottom
Nestle cutting in moss
Bury node completely
Prop up leaves if needed
Maintain humidity
Keep lid on but not airtight
Mist if moss dries out
Transition to soil
When roots are 2-3 inches
Gently remove moss
Plant in regular potting mix
How to Propagate Monstera: Step-by-Step Guide - Post-Propagation Care
The First Few Weeks: Critical Care
Your baby monstera is like, well, a baby! It needs extra TLC:
Consistent moisture (but not waterlogged)
High humidity (60%+ if possible)
Bright, indirect light (no direct sun!)
Stable temperatures (65-85°F)
No fertilizer yet (wait a month)
Transitioning Water Roots to Soil
This is where many people mess up, so pay attention!
Choose the right time
Roots 2-3 inches long
Multiple roots preferred
Healthy white color
Prepare transitional soil
Extra perlite for drainage
Slightly moist, not wet
Small pot (roots like cozy spaces)
Plant carefully
Handle roots gently (they're fragile!)
Don't bury too deep
Water lightly after planting
Maintain humidity
Mist regularly first week
Use humidity dome if struggling
Gradually reduce over 2 weeks
Signs Your Propagation is Thriving
How do you know you've nailed it? Look for:
New growth within a month
Perky, green leaves
Roots visible at drainage holes
Increased water needs
That proud plant parent feeling!
Common Propagation Problems and Solutions
The Dreaded Root Rot
Ugh, root rot. The arch-nemesis of propagators everywhere! Here's how to avoid it:
Prevention is key
Don't overwater
Ensure good drainage
Use clean tools and containers
Change water regularly
If rot strikes
Cut above affected area immediately
Sterilize tools between cuts
Start over with fresh water/soil
Cross fingers and try again
Yellowing Leaves During Propagation
Don't panic! Some yellowing is normal because:
The cutting is stressed (understandable!)
Energy is going to root production
Lower leaves might sacrifice themselves
When to worry:
All leaves turning yellow
Rapid yellowing
Mushy stems
Foul smell
Slow or No Root Growth
Patience, young grasshopper! But if it's been over a month:
Check your conditions
Temperature too low?
Not enough light?
Water quality issues?
Give it a boost
Try rooting hormone
Add heat mat
Increase humidity
Change propagation method
Special Considerations for Different Monstera Varieties
Monstera Deliciosa vs. Others
While this guide focuses on the classic deliciosa, here's the scoop on others:
Monstera Adansonii (Swiss Cheese Vine)
Propagates even easier!
Smaller cuttings work fine
Roots super quickly
Monstera Thai Constellation
More finicky due to variegation
Needs more light
Growth is slower
Monstera Albo
High risk, high reward
Protect white sections
Extra patience required
Variegated Monstera Propagation Tips
Got a variegated beauty? Lucky you! But they need special care:
More light required (but still indirect)
White sections can't photosynthesize
Growth is naturally slower
Higher chance of reverting to green
Each cutting is unique!
Advanced Propagation Tips and Tricks
Maximizing Your Success Rate
Want to go from propagation newbie to pro? Try these:
Take multiple cuttings (hedge your bets!)
Use growth hormones (auxin-based work best)
Maintain consistent temps (75-80°F is ideal)
Add aquarium air stone to water prop
Try different methods simultaneously
Creating Multiple Plants from One Cutting
Why settle for one when you can have many?
Look for multi-node stems
Cut between each node
Ensure each section has node
Propagate separately
Profit! (Or gift!)
Propagation Station Setup Ideas
Make it pretty and functional:
Test tube stations for water props
Vintage bottles for aesthetic appeal
Wall-mounted propagation displays
Dedicated propagation shelf with grow lights
Label everything (trust me on this)
Seasonal Considerations
Spring and Summer: Prime Time
This is when your monstera is in beast mode:
Fastest rooting times
Highest success rates
Parent plant recovers quickly
New growth appears faster
Fall and Winter: Proceed with Caution
You can still propagate, but:
Expect slower rooting
Provide extra warmth
Consider grow lights
Be extra patient
Maybe wait until spring?
The Business Side of Monstera Propagation
Turning Your Hobby into Income
Real talk: people pay good money for monsteras! Consider:
Local plant swaps
Facebook Marketplace
Etsy shops
Instagram plant sales
Farmers markets
Pricing Your Propagations
Factors to consider:
Size of cutting
Number of leaves
Root development
Local market rates
Rarity of variety
Conclusion
There you have it, folks! Everything you need to know about "How to Propagate Monstera: Step-by-Step Guide" and then some. Whether you choose water, soil, or get fancy with air layering, remember that propagation is part science, part art, and a whole lot of patience. Don't get discouraged if your first attempt doesn't work out perfectly. Even experienced plant parents have failures! The key is to keep trying, learn from mistakes, and enjoy the magical process of creating new life from your beloved monstera.
Read next: How to Prune Monstera for Healthier Fuller Growth
Frequently Asked Questions
Q1: How long does monstera propagation take?
A: Roots appear in 2-4 weeks; planting ready in 4-8 weeks typically.
Q2: Can you propagate monstera without a node?
A: No, nodes are essential; leaves alone won't grow roots unfortunately.
Q3: Why is my monstera cutting turning yellow?
A: Normal stress response; worry if all leaves yellow or stem rots.
Q4: What's the best propagation method for beginners?
A: Water propagation is easiest to monitor and generally most successful.
Q5: Can I propagate monstera in winter?
A: Yes, but expect slower results; provide warmth and extra light.